Install and Configure SQL Server 2017 Availability Groups on Linux - Part 5

 Problem

In a previous tip on Installing SQL Server vNext CTP1 on Red Hat Linux 7.2, we have read about how we can now install SQL Server 2017 on a Linux operating system. We would like to evaluate running SQL Server 2017 Availability Groups on Linux. How do we go about building the Linux environment for SQL Server 2017 Availability Groups?

Solution

To continue this series on Step-by-step Installation and Configuration of SQL Server 2017 Availability Groups on a Linux Cluster, we will look at adding the SQL Server 2017 Always On Availability Group as a resource in the cluster. In Part 4, you have learned how to install and configure Pacemaker on Linux. This tip will walk you through the process of creating and configuring the SQL Server Always On Availability Group with the corresponding listener name as cluster resources.

Creating the SQL Server Always On Availability Group Resources on Pacemaker

Similar to creating a SQL Server Always On Availability Group on a Windows Server Failover Cluster (WSFC), a cluster resource is created. This allows the WSFC to control and manage the Availability Group for automatic failover, health detection and failure detection. The way the WSFC does this is thru the Always On Availability Group cluster resource DLL – hadrres.dll. The cluster resource DLL is the interface between the WSFC and SQL Server. While the WSFC detects health and failure and initiates automatic failover, it does so thru the cluster resource DLL.

The concept is similar with Pacemaker. The cluster resource agent that you installed in Part 2 - mssql-server-ha – is the interface between Pacemaker and SQL Server. It tells Pacemaker about the status and health of the resource – in this case, the SQL Server Always On Availability Group – so the cluster can decide how to deal with it to maintain high availability.

When you create a SQL Server Always On Availability Group on a WSFC, a cluster resource is automatically created for you. This is done thru the tight integration between SQL Server and the WSFC. Not so with Pacemaker. It is your responsibility as the administrator to manually create the cluster resources.

Here’s a high-level overview of the steps for your reference. 

  1. Create the Always On Availability Group resource on Pacemaker
  2. Create the virtual IP address resource for the Always On Availability Group listener
  3. Configure the Always On Availability Group resource to run on the same machine as the virtual IP address resource
  4. Configure the order in which the cluster resources should start/stop

Step #1: Create the Always On Availability Group Resource on Pacemaker

NOTE: Perform this step on ANY of the Linux servers. You don’t need to run it on all nodes. Remember to log in with super user (root) privileges when performing these stepsThis example uses linuxha-sqlag1 to run the command.

Creating the Always On Availability Group resource on Pacemaker requires configuring it as a type called clone.  Cloned resources were initially intended for allowing multiple instances of a virtual IP address resource to run on several or all cluster nodes at the same time for load balancing. The Always On Availability Group resource is considered to be an anonymous cloned resource where the Availability Group configuration exists on all of the cluster nodes running the SQL Server instances acting as replicas. The resource behaves exactly the same everywhere it is running. But since you can only have one primary replica, there can only be one copy of the cloned resource active per cluster node.

Cloned resources are allowed to be in one of two operating modes (also called roles) – master or slave. The master role is the one controlling the state of the slave roles. In an Always On Availability Group, the master role is assigned to the node running the primary replica while the slave roles are assigned to the nodes running secondary replicas. During a failover, the slave roles can be promoted to master, much like how a secondary replica can take over the role of the primary replica.

Run the command below to create the Always On Availability Group resource on Pacemaker.

sudo pcs resource create LINUX_SQLAG ocf:mssql:ag ag_name=LINUX_SQLAG master notify=true  
			

The following parameters are used

  • LINUX_SQLAG: the name of the Pacemaker cluster resource; does not need to be the same as the name of the  Always On Availability Group
  • ocf:mssql:ag: the name of the Open Cluster Framework (OCF) resource agent, provided by mssql-server-ha
  • ag_name=LINUX_SQLAG: the name of the Always On Availability Group as defined in Part 3
  • master: defines the resource as a master/slave cloned resource
  • notify=true: tells all cloned resource before stopping or starting a copy of the clone and after the action was completed successfully
linux

Step #2: Create the virtual IP address resource for the Always On Availability Group listener

NOTE: Perform this step on ANY of the Linux servers. You don’t need to run it on all nodes. Remember to log in with super user (root) privileges when performing these stepsThis example uses linuxha-sqlag1 to run the command.

Unlike in a WSFC, there is no equivalent of a virtual network name resource in Pacemaker. In order to connect to the Always On Availability Group via the listener name, it has to be manually created in the DNS as has already been done in Part 1. You, then, need to create the corresponding virtual IP address resource on Pacemaker.

Run the command below to create the virtual IP address resource for the Always On Availability Group listener.

sudo pcs resource create AGListener_VIP ocf:heartbeat:IPaddr2 ip=10.10.10.58 cidr_netmask=24  
			

The following parameters are used

  • AGListener_VIP: the name of the virtual IP address resource; does not need to be the same as the Always On Availability Group listener name
  • ocf:heartbeat:IPaddr2: the name of the Open Cluster Framework (OCF) resource agent that manages virtual IPv4 addresses
  • ip=10.10.10.58: the virtual IP address of the Always On Availability Group listener name as defined in Part 3
  • cidr_netmask=24: the subnet mask of the Always On Availability Group listener name as defined in Part 3
solag

Step #3: Configure the Always On Availability Group resource to run on the same machine as the virtual IP address resource

NOTE: Perform this step on ANY of the Linux servers. You don’t need to run it on all nodes. Remember to log in with super user (root) privileges when performing these stepsThis example uses linuxha-sqlag1 to run the command.

Since the Always On Availability Group listener name can only redirect client applications to the primary replica, the Availability Group and the listener name both have to be running in the same cluster node all the time.  You cannot have the primary replica running on one node while the listener name on another. In a WSFC, this is made possible thru the concept of a cluster resource group.

Pacemaker also has the concept of cluster resource groups, where a set of resources that need to be located together, start sequentially, and stop in the reverse order in the same cluster node. However, since the Always On Availability Group resource is configured as a master/slave cloned resource, it cannot be added to a Pacemaker cluster resource group. In order to achieve the same behavior as cluster resource groups, the concept of a colocation constraint is used.

colocation constraint tells the cluster that the location of one resource depends on the location of another. But in order to do so, it has to take into account the preferences of the main resource. For example, if resource A depends on resource B, the cluster needs to know the configuration of resource B when deciding where to place resource A.

Decisions in a Pacemaker cluster are made based on calculated scores per resource and node.  Any node with a negative score for a resource cannot run that resource.  The cluster will run a resource on a node with the highest score. You can configure how the cluster makes decisions with the use of constraints. When defining resource constraints, you specify a score for each constraint. The score indicates the value you are assigning to this resource constraint. Pacemaker implements INFINITY (or equivalently, +INFINITY) internally as a score of 1,000,000. Addition and subtraction with it follow these three basic rules:

  • Any value + INFINITY = INFINITY
  • Any value - INFINITY = -INFINITY
  • INFINITY - INFINITY = -INFINITY

Run the command below to add colocation constraint to make sure that the Always On Availability Group resource run on the same machine as the virtual IP address resource.

sudo pcs constraint colocation add AGListener_VIP LINUX_SQLAG-master INFINITY with-rsc-role=Master  
			

The following parameters are used

  • AGListener_VIP: the name of the virtual IP address resource
  • LINUX_SQLAG-master: the name of the Always On Availability Group resource acting as the master clone
  • INFINITY: the score assigned to the resource constraint; this means that the constraint is REQUIRED
  • with-rsc-role=Master: an additional attribute of the constraint; this means that this constraint is associated with the master clone (or the Always On Availability Group primary replica)
infinity

Step #4: Configure the order in which the cluster resources should start/stop

NOTE: Perform this step on ANY of the Linux servers. You don’t need to run it on all nodes. Remember to log in with super user (root) privileges when performing these stepsThis example uses linuxha-sqlag1 to run the command.

In a WSFC, the concept of cluster resource dependencies exists to make sure that a resource will only come online if the dependent resource is already online. Think of the SQL Server Agent service. Because it is dependent on the SQL Server database engine service, it has to wait until the SQL Server database engine service is fully started before it can start. In the same way, the WSFC has to bring the Always On Availability Group listener name online before the Availability Group can be brought online.

Cluster resource dependencies can be achieved using cluster resource groups in Pacemaker. But because the Always On Availability Group resource cannot be added to a Pacemaker cluster resource group, the way to achieve cluster resource dependencies is by using an ordering constraint. An ordering constraint is simply a way to tell the cluster the order in which resources should start or stop.

Run the command below to configure the order in which the cluster resources should start/stop.

sudo pcs constraint order promote LINUX_SQLAG-master then start AGListener_VIP
			

The following parameters are used

  • promote: the action for this constraint; promote the resource from a slave resource to a master resource
  • LINUX_SQLAG-master: the name of the Always On Availability Group resource acting as the master clone
  • start: the action for the constraint after the preliminary action has completed
  • AGListener_VIP: the name of the virtual IP address resource
linuxha

The sequence of events is not quite the same as that of how a WSFC starts the Always On Availability Group when automatic failover is initiated. In a WSFC, the sequence of events is as follows:

  1. Stop Availability Group on current primary replica
  2. Stop listener name on current primary replica
  3. Start listener on new primary replica
  4. Start Availability Group on new primary replica

That’s because the colocation constraint has an implicit ordering constraint. The default sequence of events when a colocation constraint is defined on the listener name is as follows:

  1. Stop the virtual IP address resource on current primary replica
  2. Stop Availability Group on current primary replica
  3. Start the virtual IP address resource on new primary replica
  4. Start Availability Group on new primary replica

This default sequence of events can potentially lead to client applications getting redirected to the old secondary replica even before it becomes the new primary replica. That’s because there is a possibility that the listener name is brought online (step #3) even before the Always On Availability Group is fully brought offline and the secondary replica promoted to primary replica(step #2). The ordering constraint prevents that from happening. However, it also increases the recovery time objective as client applications won’t be able to connect to the databases in the Always On Availability Group until the virtual IP address resource is brought online.

Verifying Always On Availability Group Configuration

Once everything has been configured, you can verify that the Always On Availability Group is working. A simple way to verify the configuration is to run the command below.

sudo pcs status
			
linux

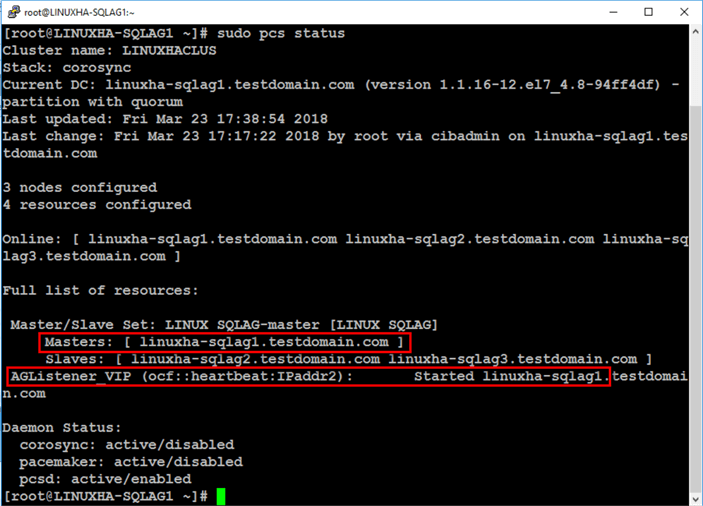
Notice that the master clone resource – LINUX_SQLAG-master – is running on linuxha-sqlag1. The virtual IP address resource – AGListener_VIP – is started and also running on linuxha-sqlag1.

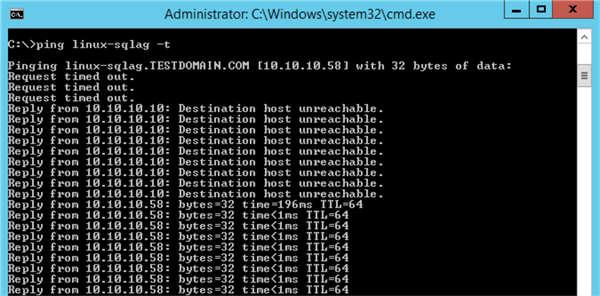
Next, test connectivity to the Availability Group listener name using a simple PING test.

administrator

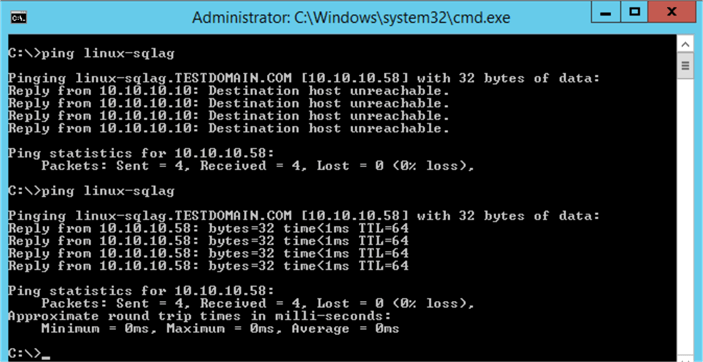
Before the virtual IP address resource was added to the cluster, there was no response when a PING test was run against the Availability Group listener name. After the virtual IP address resource was added to the cluster and started successfully, you should see a result on the IP address.

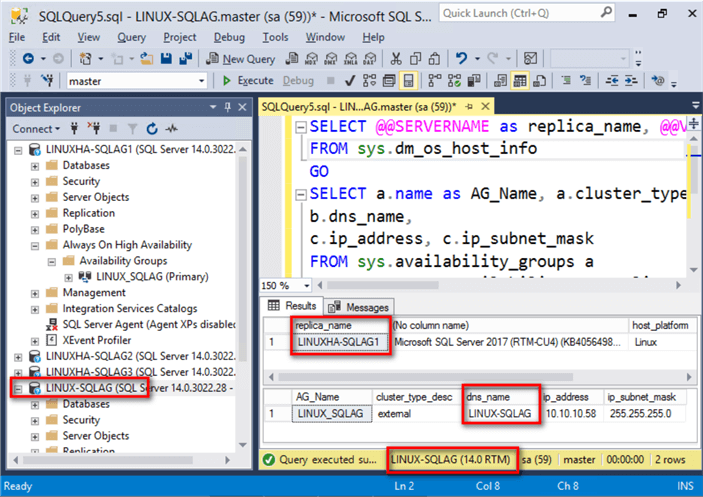
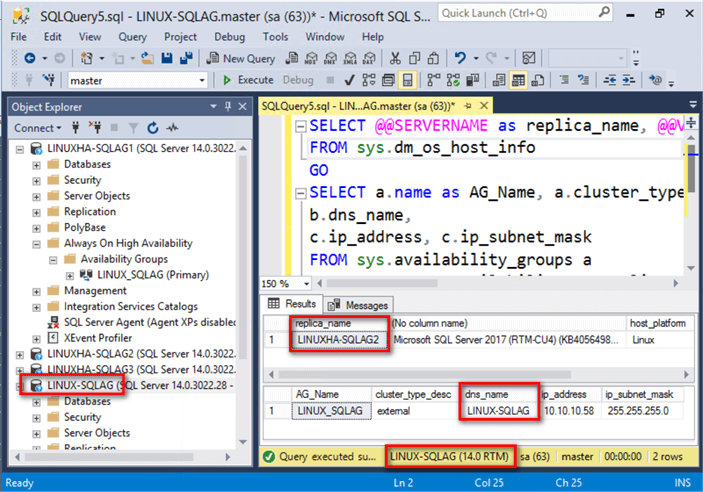
After performing a simple network test, connect to the Always On Availability Group via the listener name using SQL Server Management Studio. Use the query below to check the instance name of the primary replica and some of the properties of the Availability Group.

SELECT @@SERVERNAME as replica_name, @@VERSION, host_platform, host_distribution, host_release
FROM sys.dm_os_host_info
GO  
SELECT a.name as AG_Name, a.cluster_type_desc,
b.dns_name,
c.ip_address, c.ip_subnet_mask
FROM sys.availability_groups a
INNER JOIN sys.availability_group_listeners b
ON a.group_id=b.group_id
INNER JOIN sys.availability_group_listener_ip_addresses c
ON b.listener_id=c.listener_id
			
linux

NOTE: Once you’ve added the Always On Availability Group as a cluster resource on Pacemaker, you can no longer use ALTER AVAILABILITY GROUP command nor SQL Server Management Studio to initiate manual failover. The proper way to initiate a manual failover is thru the use of the pcs resource move command.

Testing Automatic Failover

An easy way to test automatic failover is to shut down the node that is currently running the primary replica. Run the command below to initiate an immediate shutdown.

sudo shutdown now
			
linux

If you are running a continuous PING test, you will temporarily get a request timed out response until the Always On Availability Group has been automatically failed over.

installation configuration sql server 2017 availability groups linux cluster 009

Once you get a response from the PING test, you can re-run the same query above to verify the new primary replica.

administrator

You can re-run the command below to check the status of the cluster and the resources.

sudo pcs status
			
linux

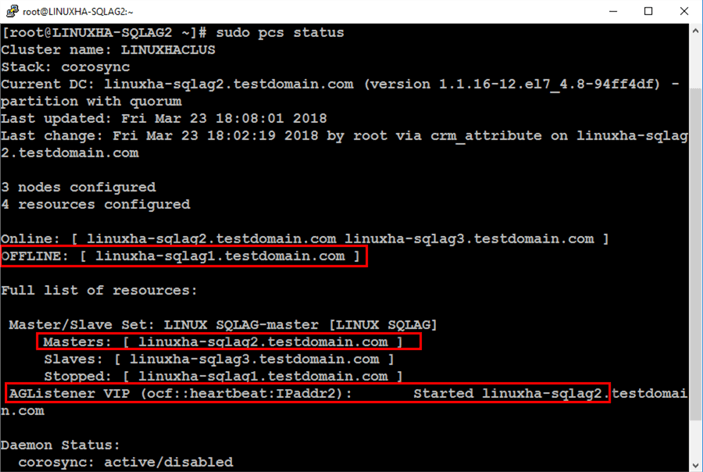
Notice that because the original primary – linuxha-sqlag1 – was shut down, the cluster automatically moved the resources to linuxha-sqlag2. This is a simple test to verify that automatic failover works.

Implementing a SQL Server Always On Availability Group on a Linux cluster requires proper planning and thorough documentation.  Use this tip series as a guide to help you successfully provide high availability to your SQL Server databases using Always On Availability Groups on Linux.

Next Steps

Install and Configure SQL Server 2017 Availability Groups on Linux - Part 4

Problem

In a previous tip on Installing SQL Server vNext CTP1 on Red Hat Linux 7.2, we have read about how we can now install SQL Server 2017 on a Linux operating system. We would like to evaluate running SQL Server 2017 Availability Groups on Linux. How do we go about building the Linux environment for SQL Server 2017 Availability Groups?

Solution

To continue this series on Step-by-step Installation and Configuration of SQL Server 2017 Availability Groups on a Linux Cluster, we will look at configuring Pacemaker on Linux to provide high availability for the SQL Server 2017 Always On Availability Group. In Part 3, you have learned how to create the Always On Availability Group with its corresponding listener name. This tip will walk you through the installation and configuration of Pacemaker, the Linux cluster resource manager.

Introducing Pacemaker on Linux

On a Windows Server operating system, it is the Windows Server Failover Cluster (WSFC) that provides high availability, failure detection and automatic failover to the SQL Server Always On Availability Group. WSFC is an example of a cluster resource manager (CRM), a software that runs on all of the nodes in the cluster responsible for maintaining a consistent image of the cluster. The goal of a cluster resource manager is to provide high availability and fault tolerance to resources running on top of the cluster. 

On a Linux operating system, the de facto cluster resource manager is the open source software Pacemaker. Its development is a collaborative effort driven mainly by RedHat and SUSE under the ClusterLabs organization with contributions from the community. Pacemaker is available on most Linux distributions but SQL Server Always On Availability Groups is only currently supported on Red Hat Enterprise Linux version 7.3/7.4, SUSE Linux Enterprise Server version 12 SP2 and Ubuntu version 16.04.

The Pacemaker stack consists of the following components:

  • The Pacemaker software itself which is similar to the Cluster service on Windows
  • Corosync, a group communication system similar to the heartbeat and quorum on Windows (don’t get confused with Heartbeat, which is a Linux daemon that functions similar to Corosync); it is also responsible for restarting failed application process
  • libQB, a high-performance logging, tracing, inter-process communication and polling system similar to how the cluster.log is generated on Windows
  • Resource Agents, software that allows Pacemaker to manage services and resources like starting or stopping a SQL Server Always On Availability Group resource like the cluster resource DLL on Windows
  • Fence Agents, software that allows Pacemaker to isolate and prevent misbehaving nodes from affecting the availability of the cluster

An understanding of these different components is essential to properly configure and manage Pacemaker on Linux.

How to Install and Configure Pacemaker on Linux

Installing and configuring Pacemaker on Linux isn’t as easy as configuring a WSFC.  Here’s a high-level overview of the steps for your reference. Be very careful with going thru all of the steps.

  1. Install the Pacemaker packages
  2. Start the pcs daemon and force it to start on system boot
  3. Configure the Linux firewall to allow Pacemaker communications
  4. Force the Pacemaker and Corosync daemons to start on system boot
  5. Assign a password to the default hacluster account
  6. Setup authentication between the Linux cluster nodes
  7. Create the Linux cluster
  8. Start the Linux cluster
  9. Configure fencing
  10. Configure resource-level policies
  11. Create a SQL Server login for Pacemaker
  12. Save credentials for the Pacemaker login on the local file system

Some of these steps have to be done on either one or all of the Linux servers.  Read the NOTE section on every step before running the commands.

Step #1: Install the Pacemaker packages

NOTE: Perform this step on all of the Linux servers. Remember to log in with super user (root) privileges when performing these steps.

Run the command below to install Pacemaker and all of the related packages. This is similar to installing the Failover Clustering feature in Windows.

sudo yum install pacemaker pcs fence-agents-all resource-agents  
			

If you look at the packages being installed, they refer to the different components that make up the Pacemaker stack.

  • pcs = Pacemaker Configuration System, the Pacemaker and Corosync configuration tool
  • fence-agents-all = a collection of all supported fence agents
  • resource-agents = a repository of all resource agents (RAs) compliant with the Open Cluster Framework (OCF) specification

Note the existence of the SQL Server resource agent that was installed in Part 2.

sql server resource agent on linux

Type y when prompted to download the packages, including the Linux security signing key.

download package on linux

Step #2: Start the pcs daemon and force it to start on system boot

NOTE: Perform this step on all of the Linux servers. Remember to log in with super user (root) privileges when performing these steps.

Run the commands below to start the pcs daemon and force it to launch on system boot.

sudo systemctl start pcsd
sudo systemctl enable pcsd  
			
linux commands

Step #3: Configure the Linux firewall to allow Pacemaker communications

NOTE: Perform this step on all of the Linux servers. Remember to log in with super user (root) privileges when performing these steps.

Run the command below to allow Pacemaker communications between cluster nodes. By default, FirewallD is the firewall solution available on RHEL/CentOS.

sudo firewall-cmd --add-service=high-availability --zone=public --permanent  
			
linux commands

In cases where the Linux firewall does not have a built-in high availability configuration, you can explicitly open the following port numbers:

  • TCP port 2224 = for pcs and internode communication
  • TCP port 3121 = for running Pacemaker Remote, used for scaling out Pacemaker and having the different components run on different servers
  • UDP port 5405 = for Corosync
sudo firewall-cmd --zone=public --add-port=2224/tcp --permanent
sudo firewall-cmd --zone=public --add-port=3121/tcp –permanent
sudo firewall-cmd --zone=public --add-port=5405/udp --permanent  
			

Run the command below to reload the new firewall rule added

sudo firewall-cmd --reload  
			
linux commands

Step #4: Force the Pacemaker and Corosync daemons to start on system boot

NOTE: Perform this step on all of the Linux servers. Remember to log in with super user (root) privileges when performing these steps.

Run the commands below to force the Pacemaker and Corosync daemons to start on system boot.

sudo systemctl enable pacemaker.service
sudo systemctl enable corosync.service  
			
linux commands

Step #5: Assign a password to the default hacluster account

NOTE: Perform this step on all of the Linux servers. Remember to log in with super user (root) privileges when performing these steps.

Run the command below to assign a password to the default hacluster account.  Use the same password on all cluster nodes.

sudo passwd hacluster  
			
linux commands

By default, a new user account named hacluster is created when Pacemaker is installed. This account is used to manage the Linux cluster. Since there is no centralized directory service for authentication, this user account is created on all nodes and used to impersonate the security context of the administrator managing the Linux cluster. Hence, the hacluster account needs to have the same password on all of the cluster nodes.

Step #6: Setup authentication between the Linux cluster nodes

NOTE: Perform this step on ANY of the Linux servers. You don’t need to run it on all nodes. Remember to log in with super user (root) privileges when performing these stepsThis example uses linuxha-sqlag1 to run the command.

Run the command below to authenticate thru each of the Linux cluster nodes using the hacluster user. You will be prompted for the password for the hacluster user.

sudo pcs cluster auth linuxha-sqlag1.testdomain.com linuxha-sqlag2.testdomain.com linuxha-sqlag3.testdomain.com -u hacluster  
			
linux commands

Step #7: Create the Linux cluster

NOTE: Perform this step on ANY of the Linux servers. You don’t need to run it on all nodes. Remember to log in with super user (root) privileges when performing these stepsThis example uses linuxha-sqlag1 to run the command.

Run the command below to create the Linux cluster. LINUXHACLUS is the name of the Linux cluster with linuxha-sqlag1linuxha-sqlag2 and linuxha-sqlag3 as nodes.

sudo pcs cluster setup --name LINUXHACLUS linuxha-sqlag1.testdomain.com linuxha-sqlag2.testdomain.com linuxha-sqlag3.testdomain.com  
			
linux commands

Step #8: Start the Linux cluster

NOTE: Perform this step on ANY of the Linux servers. You don’t need to run it on all nodes. Remember to log in with super user (root) privileges when performing these stepsThis example uses linuxha-sqlag1 to run the command.

Run the command below to start the cluster service on all nodes.

sudo pcs cluster start --all  
			
linux commands

Step #9: Configure fencing

NOTE: Perform this step on all of the Linux servers. Remember to log in with super user (root) privileges when performing these steps.

Fencing is the process of isolating and preventing a misbehaving node from affecting the availability of the cluster. It is similar to how Quarantine works in Windows Server 2016 failover clusters (the concept of fencing has been in Windows since Windows Server 2003 thru the implementation of quorum types but have been improved with the introduction of Quarantine). In a cluster that has a shared resource, like a shared disk, fencing prevents the misbehaving node from accessing it to avoid potential data corruption.  This allows the cluster to be in a clean, known state.

The way fencing is implemented in Pacemaker is thru STONITH – an acronym for “Shoot The Other Node In The Head”. There are different STONITH devices and plugins that can be used to implement fencing, depending on your environment. You can use a smart power distribution unit (PDU), a network switch, HP iLO devices or even plugins like a VMWare STONITH agent.  At the moment, there is no supported STONITH agent for Hyper-V nor Microsoft Azure (or any cloud environment). For this example, since no STONITH device is used, it will be disabled.

NOTE: This is not recommended in a production environment. Properly configure a STONITH device and keep it enabled.

Run the command below to disable STONITH.

sudo pcs property set stonith-enabled=false  
			
linux commands

Step #10: Configure resource-level policies

NOTE: Perform this step on all of the Linux servers. Remember to log in with super user (root) privileges when performing these steps.

In a WSFC, the way the cluster manages a resource depends on how it is configured. Take a look at the screenshot below which is a property of a SQL Server Always On Availability Group running on a WSFC.

sql server availability group settings

The Response to resource failure section of the Policies tab specifies that if a resource fails, the cluster will attempt to restart it once (defined by the Maximum restarts in the specified period field) on the current node first within a period of 15 minutes. If the restart is unsuccessful, the cluster will failover the resource to any of the available cluster nodes.

Pacemaker has a similar property called start-failure-is-fatal. If a resource fails, Pacemaker will attempt to stop it and restart it, choosing the best location each time and can be the same node that it was previously running on. This behavior is determined by the migration-threshold (similar to the Maximum restarts in the specified period field) and the failure-timeout parameters. When the start-failure-is-fatalparameter value is set to false, the cluster will decide whether to try starting on the same node again based on the resource's current failure count and migration threshold.

Run the command below to set the cluster property start-failure-is-fatal to false.

sudo pcs property set start-failure-is-fatal=false  
			
linux commands

Step #11: Create a SQL Server login for Pacemaker

NOTE: Perform this step on all of the SQL Server instances configured as replicas in the Always On Availability Group.

Similar to WSFC, Pacemaker will be responsible for performing automatic failover of the SQL Server Always On Availability Group. This is done thru the Linux cluster resource agent for SQL Server Always On Availability Groups – mssql-server-ha. In order for Pacemaker to perform automatic failover, it needs to be able to connect to SQL Server via a login.

Run the script below to create the SQL Server login named pacemakerLogin.

--Run this on the primary replica/LINUXHA-SQLAG1. Just to be sure, enable SQLCMD mode in SSMS
--Pass the SQL Server credentials since this is configured for mixed mode authentication  
:CONNECT LINUXHA-SQLAG1 -U sa -P y0ur$ecUr3PAssw0rd
USE master  
GO
CREATE LOGIN pacemakerLogin 
WITH PASSWORD = 'y0ur$ecUr3PAssw0rd';  
GO  
			

You also need to grant the SQL Server login the appropriate permissions to manage the Always on Availability Group, like running the ALTER AVAILABILITY GROUP command to initiate a failover.

NOTE:Be sure to replace LINUX_SQLAG with the name of your Always On Availability Group.

--Run this on the primary replica/LINUXHA-SQLAG1. Just to be sure, enable SQLCMD mode in SSMS
--Pass the SQL Server credentials since this is configured for mixed mode authentication  
:CONNECT LINUXHA-SQLAG1 -U sa -P y0ur$ecUr3PAssw0rd
USE master  
GO
GRANT ALTER, CONTROL, VIEW DEFINITION ON AVAILABILITY GROUP::LINUX_SQLAG TO pacemakerLogin
GO
GRANT VIEW SERVER STATE TO pacemakerLogin
GO  
			

Create the same login on all of the Availability Group replicas.

--Run this on the secondary replica/LINUXHA-SQLAG2. Just to be sure, enable SQLCMD mode in SSMS
--Pass the SQL Server credentials since this is configured for mixed mode authentication  
:CONNECT LINUXHA-SQLAG2 -U sa -P y0ur$ecUr3PAssw0rd
USE master  
GO
CREATE LOGIN pacemakerLogin 
WITH PASSWORD = 'y0ur$ecUr3PAssw0rd';  
GO  
GRANT ALTER, CONTROL, VIEW DEFINITION ON AVAILABILITY GROUP::LINUX_SQLAG TO pacemakerLogin
GO
GRANT VIEW SERVER STATE TO pacemakerLogin
GO
--Run this on the secondary replica/LINUXHA-SQLAG3. Just to be sure, enable SQLCMD mode in SSMS
--Pass the SQL Server credentials since this is configured for mixed mode authentication  
:CONNECT LINUXHA-SQLAG3 -U sa -P y0ur$ecUr3PAssw0rd
USE master  
GO
CREATE LOGIN pacemakerLogin 
WITH PASSWORD = 'y0ur$ecUr3PAssw0rd';  
GO  
GRANT ALTER, CONTROL, VIEW DEFINITION ON AVAILABILITY GROUP::LINUX_SQLAG TO pacemakerLogin
GO
GRANT VIEW SERVER STATE TO pacemakerLogin
GO
			

Step #12: Save credentials for the Pacemaker login on the local file system

NOTE: Perform this step on all of the Linux servers. Remember to log in with super user (root) privileges when performing these steps.

Pacemaker will use the SQL Server login – pacemakerLogin – to connect to the SQL Server instances configured as Availability Group replicas.  In order to remember the login name and password, the credentials need to be stored in a file. You need to create a file named passwd in the /var/opt/mssql/secrets folder

Run the command below to create the file named passwd using the vi command.

sudo vi /var/opt/mssql/secrets/passwd  
			
linux commands

Type the login name and password on the file and save it.

linux commands

Since you are logged in as root when you created the file, it will be owned by the root user. You can verify this by running the command below.

sudo ls -l /var/opt/mssql/secrets  
			
linux commands

Run the command below to restrict access to the file by only allowing the file owner (root) read-only permissions. 

sudo chmod 400 /var/opt/mssql/secrets/passwd  
			
linux commands

Repeat this step to make sure that the passwd file exists on all of the nodes in the Linux cluster.

All you’ve done up to this point is to install and configure Pacemaker in preparation for configuring SQL Server Always On Availability Group to run on top of the cluster. Run the command below to check the status of the cluster.

sudo pcs status --full  
			
linux commands

Notice that even though the Pacemaker and Corosync daemons have been configured to start on system boot in Step #4, they are still marked as disabled. This was done after the cluster has been created. The reason for this is that not all administrators would want to enable the cluster to start up on reboot. For example, if the node went down, you might want to be sure that it was fixed before re-joining the cluster. If you want to force the Pacemaker and Corosync daemons to start on system boot, you need to perform Step #4 after the SQL Server Always On Availability Group has been added as a resource on the cluster.

In the next tip in this series, you will configure the SQL Server 2017 Always On Availability Group and the virtual IP address of the listener name as resources in the cluster.